Notifications and Actions
Overview
When setting up a monitor, you have the option to select specific actions to be taken upon anomaly detection. Notifications can be sent via various channels such as Slack, PageDuty, email, or custom webhooks. Users can also submit a support request to request custom actions such as pipeline triggers.
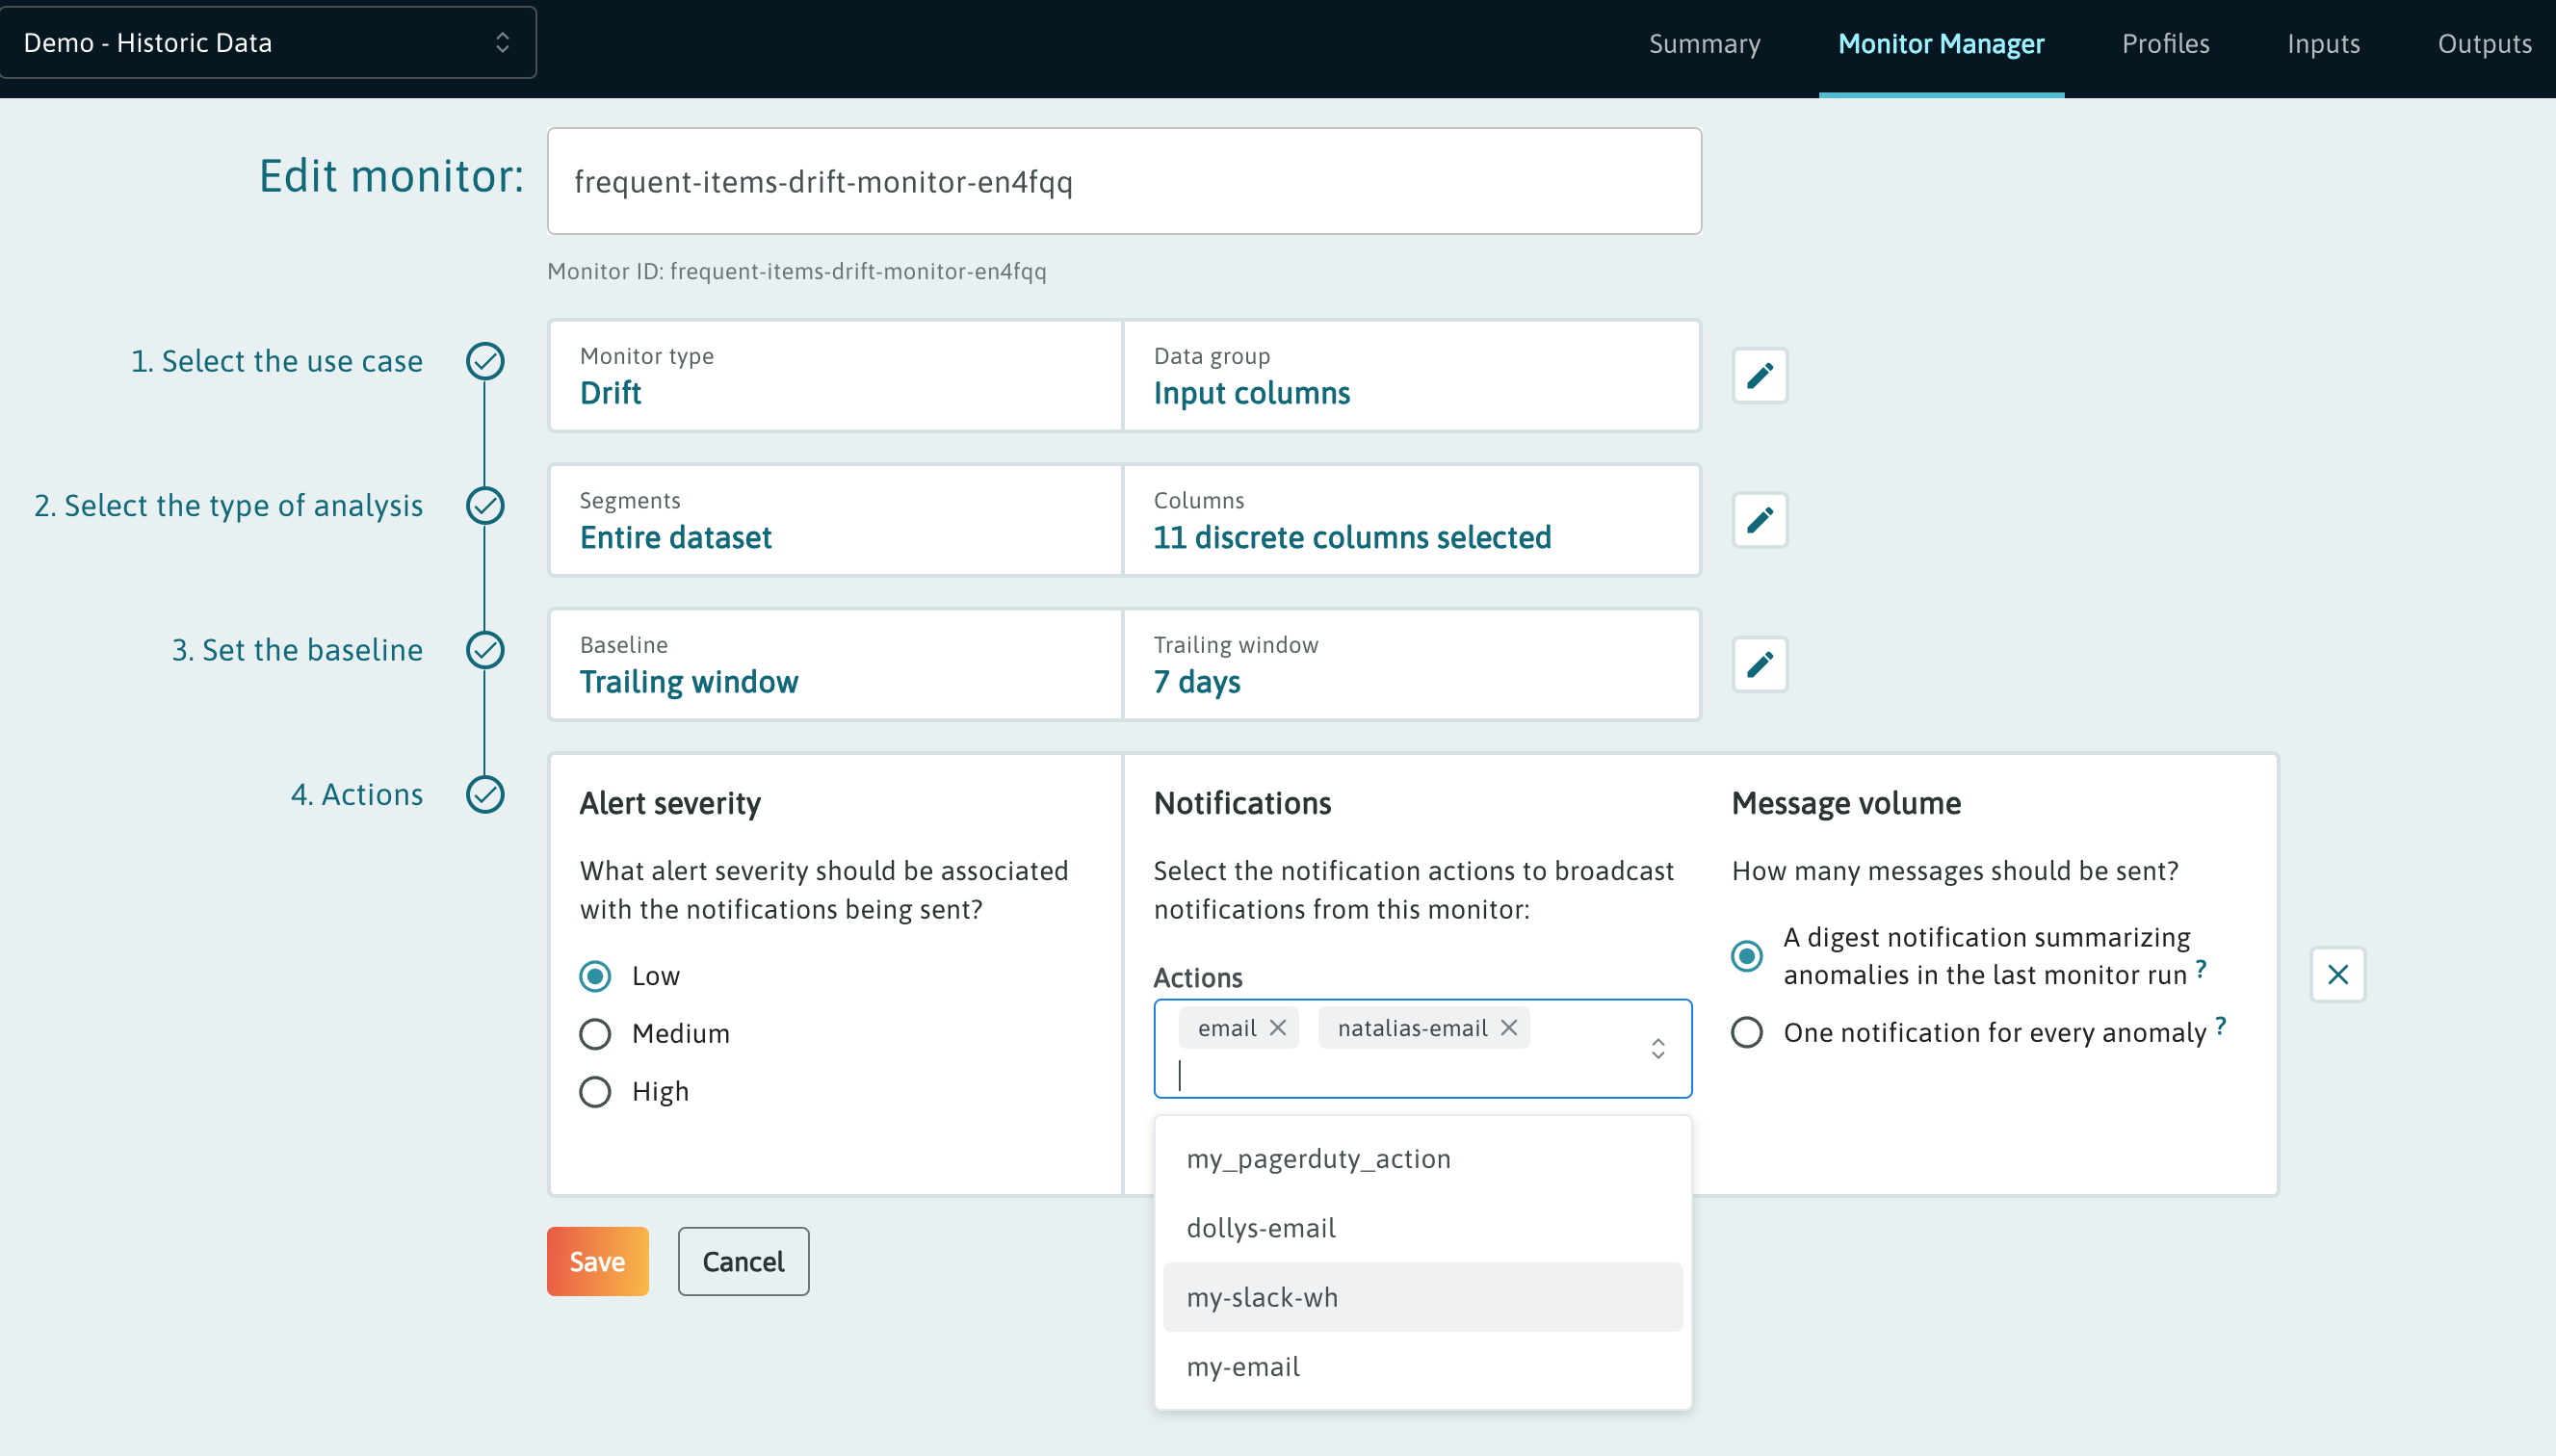
There can be multiple notification actions assigned to a single monitor. In the screenshot below you can see that two actions (one sending notifications via email and the other one targeting a Slack channel) are being added to a drift monitor.
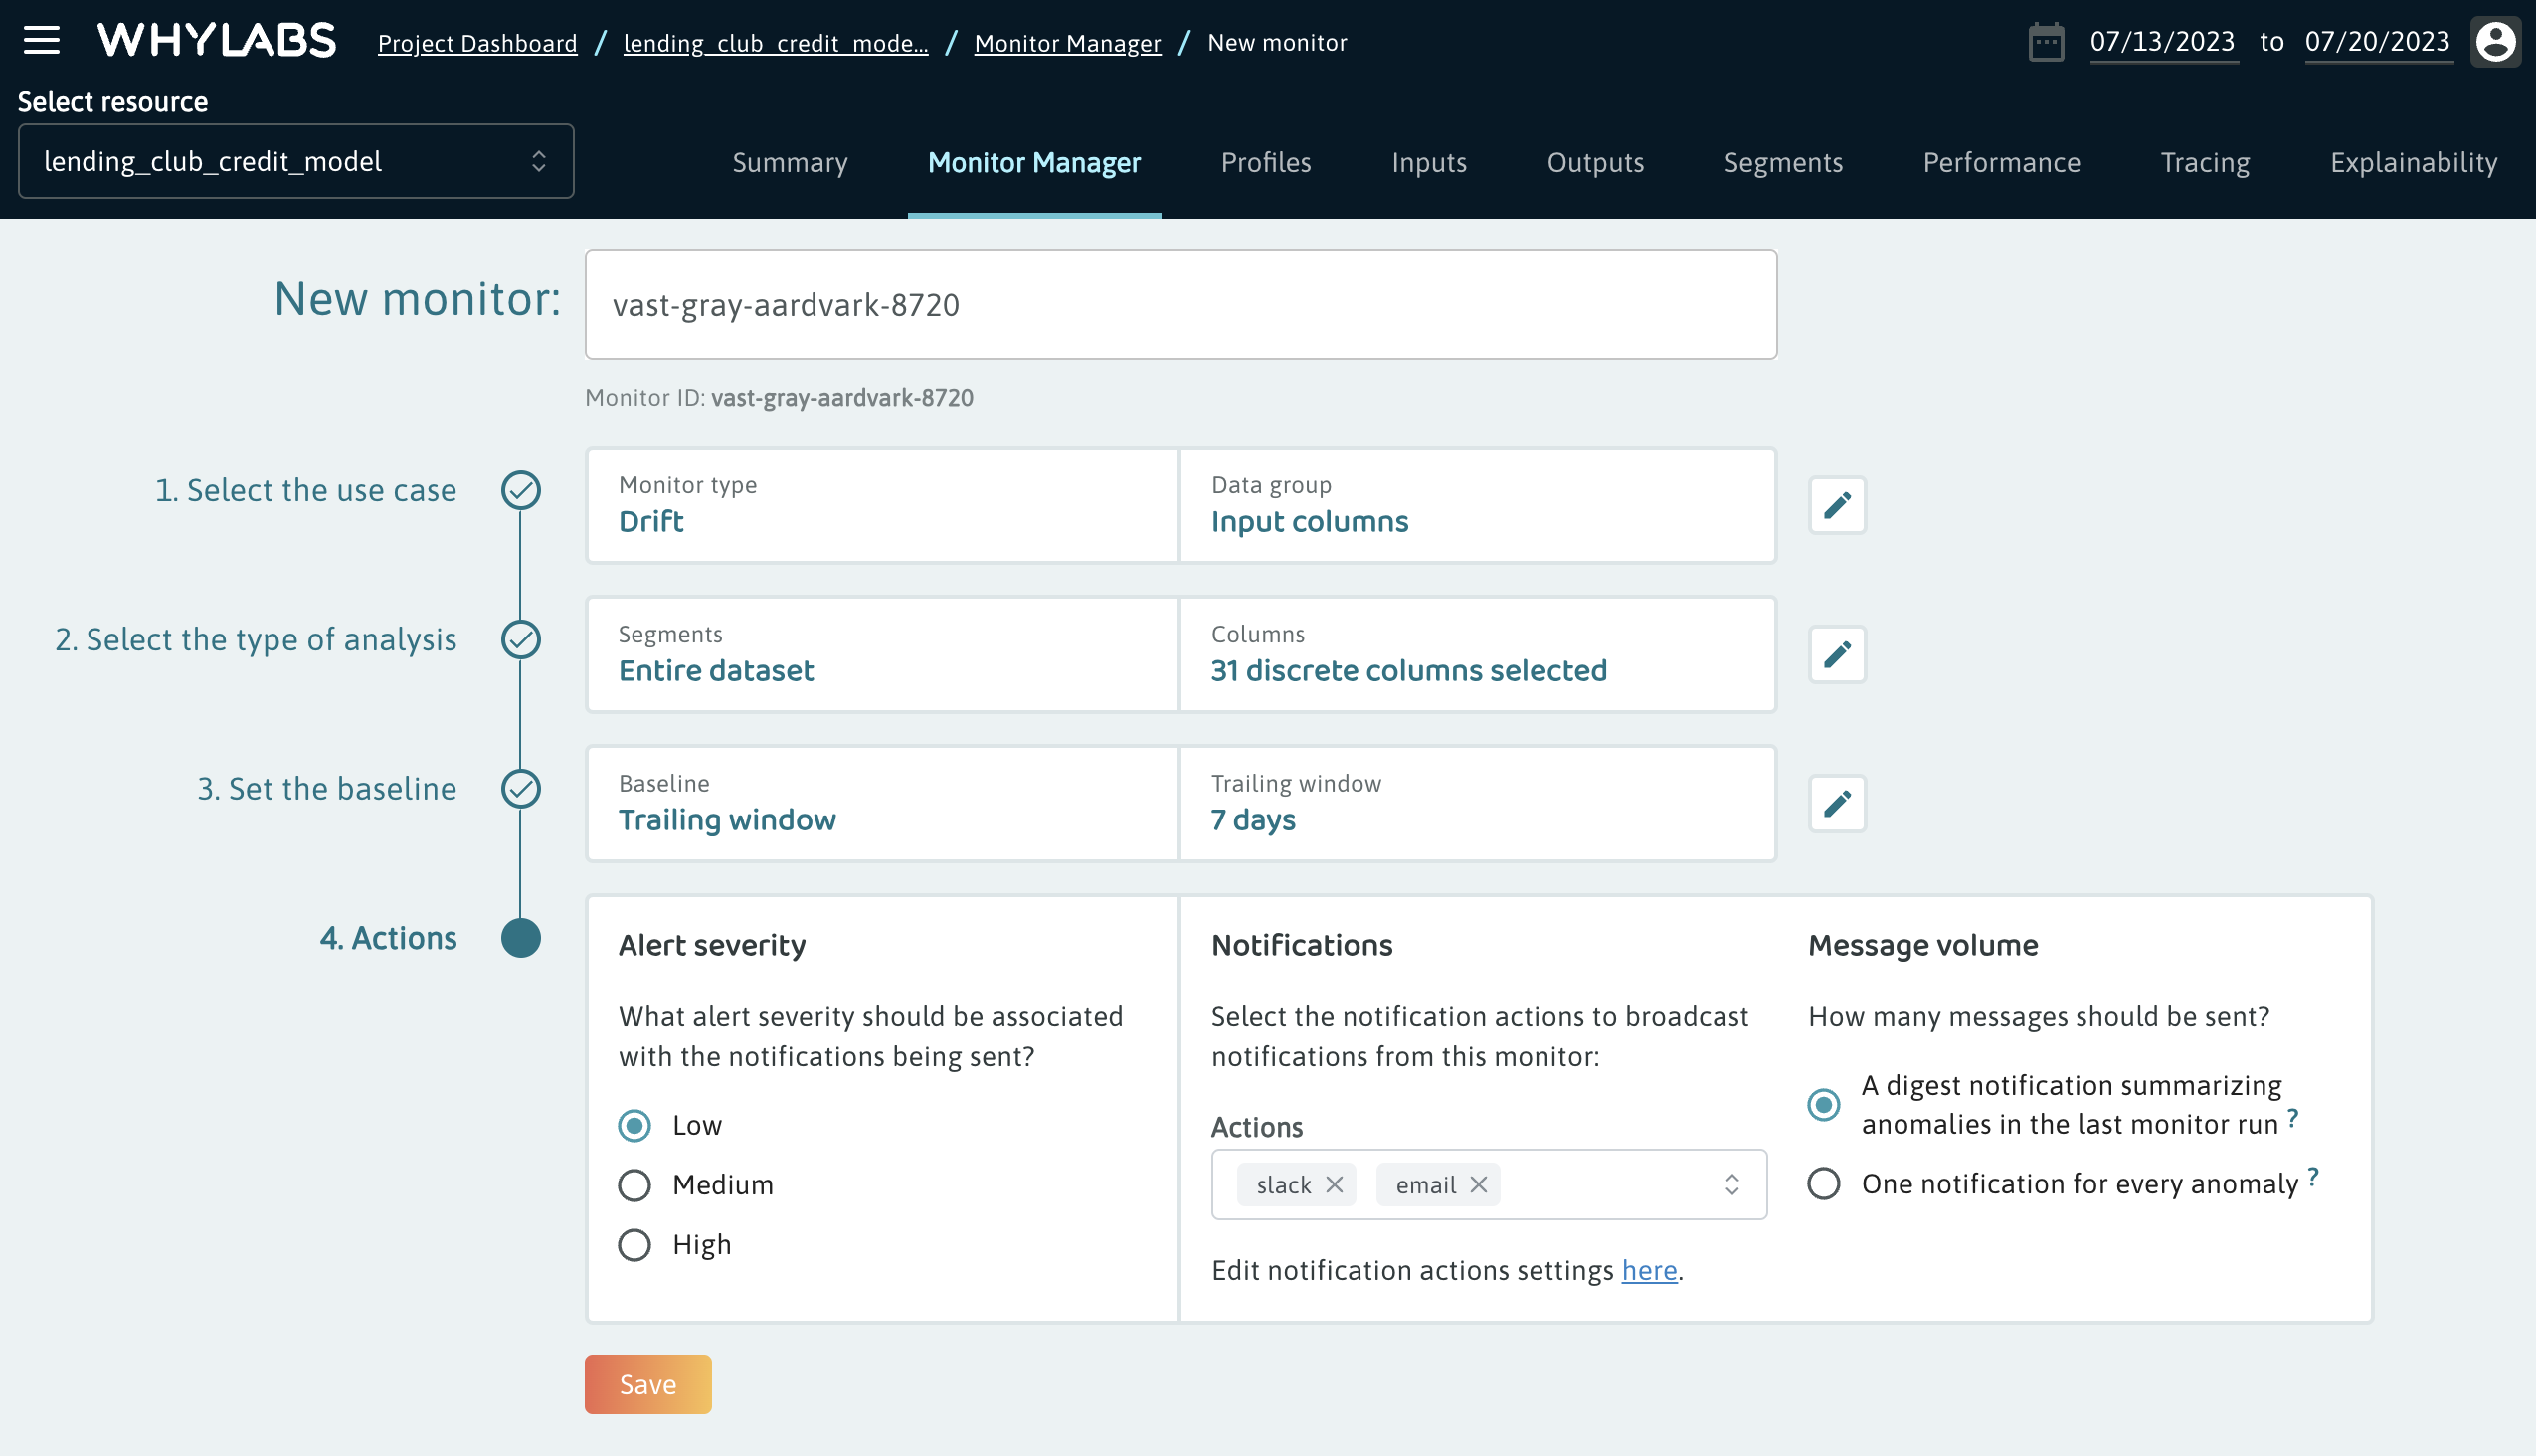
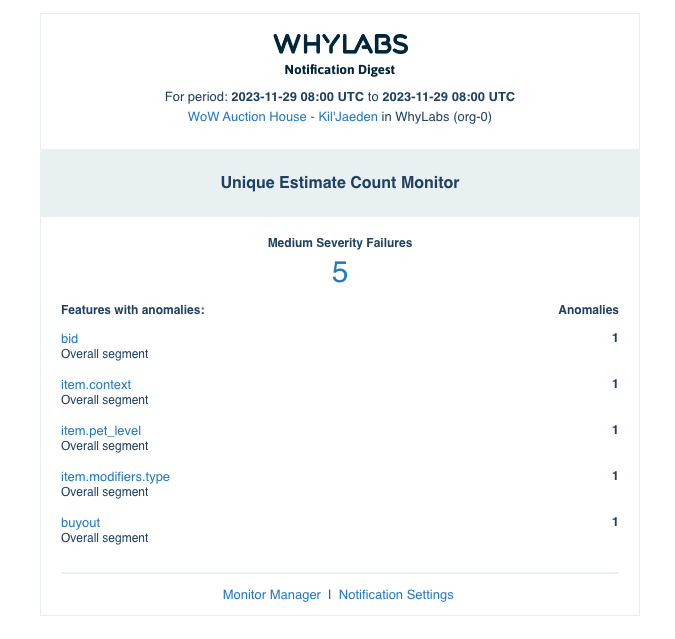
You can control the volume of messages by choosing to receive a digest which delivers a summary of all anomalies, or to receive a notification for each anomaly (only recommended for cases with high severity anomalies). The severity level for these anomalies is set to low, which might be a parameter used in any downstream processes for further incident management.
Creating Notification Actions
To make the notification channels available for selection in the Monitor Manager, they must first be configured in the Notification settings page. Please note that settings are only available for users with admin permissions.
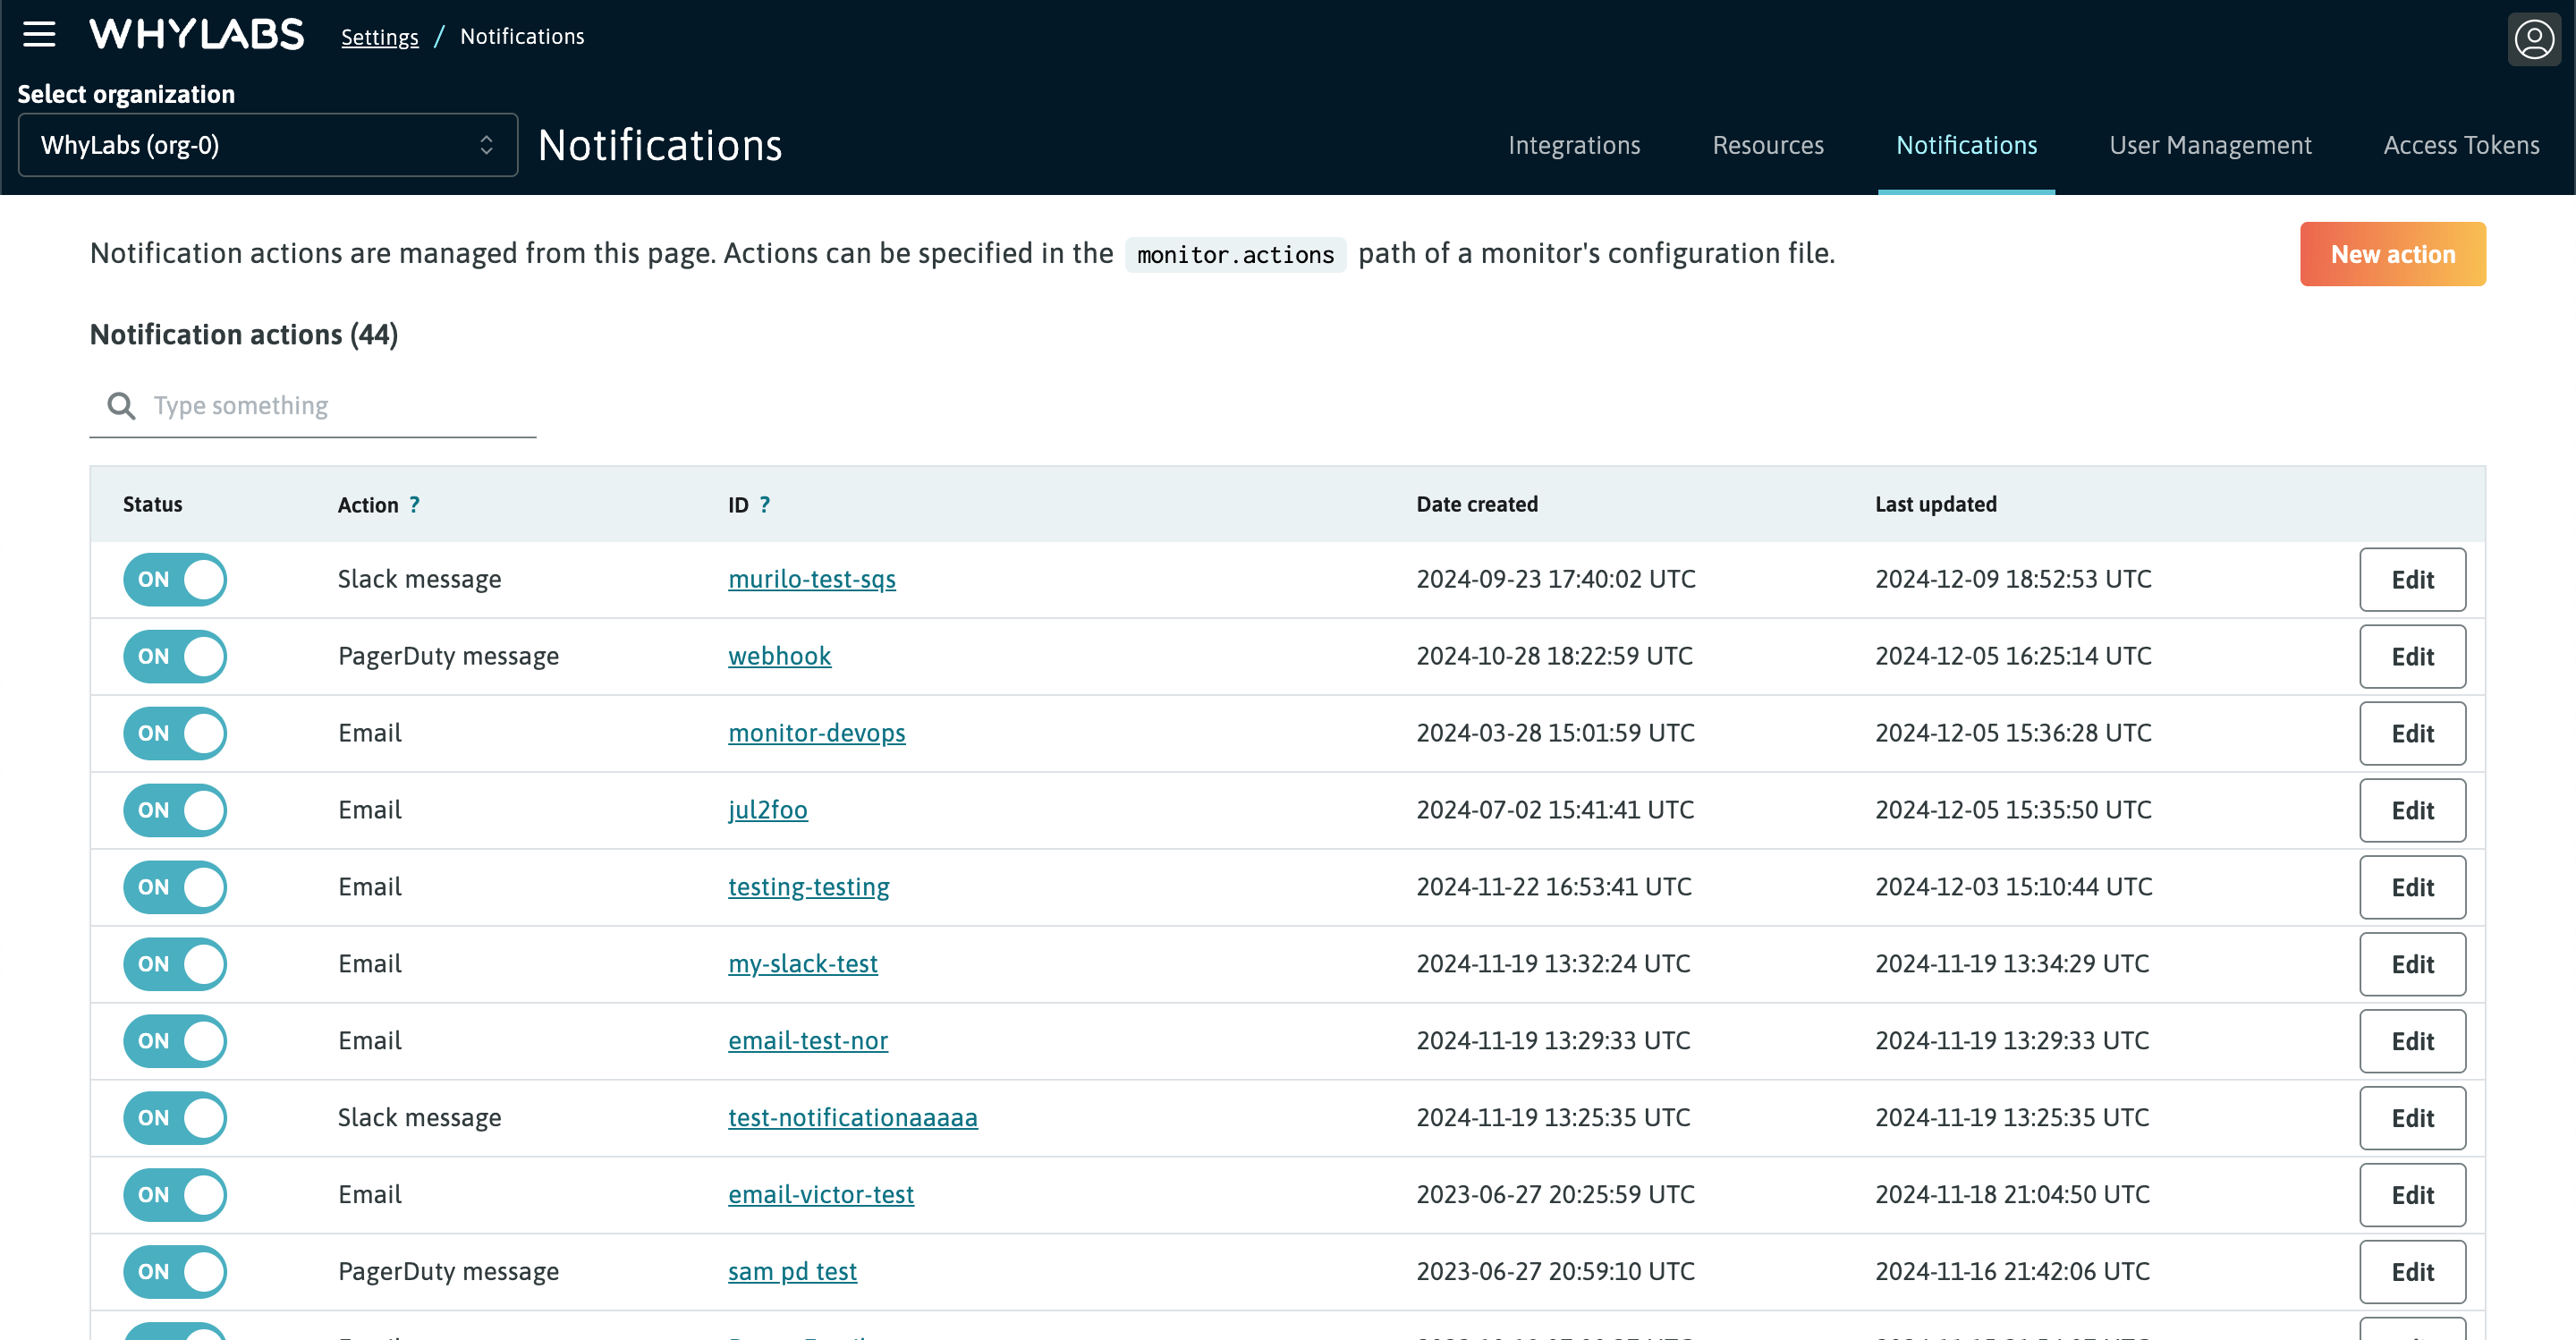
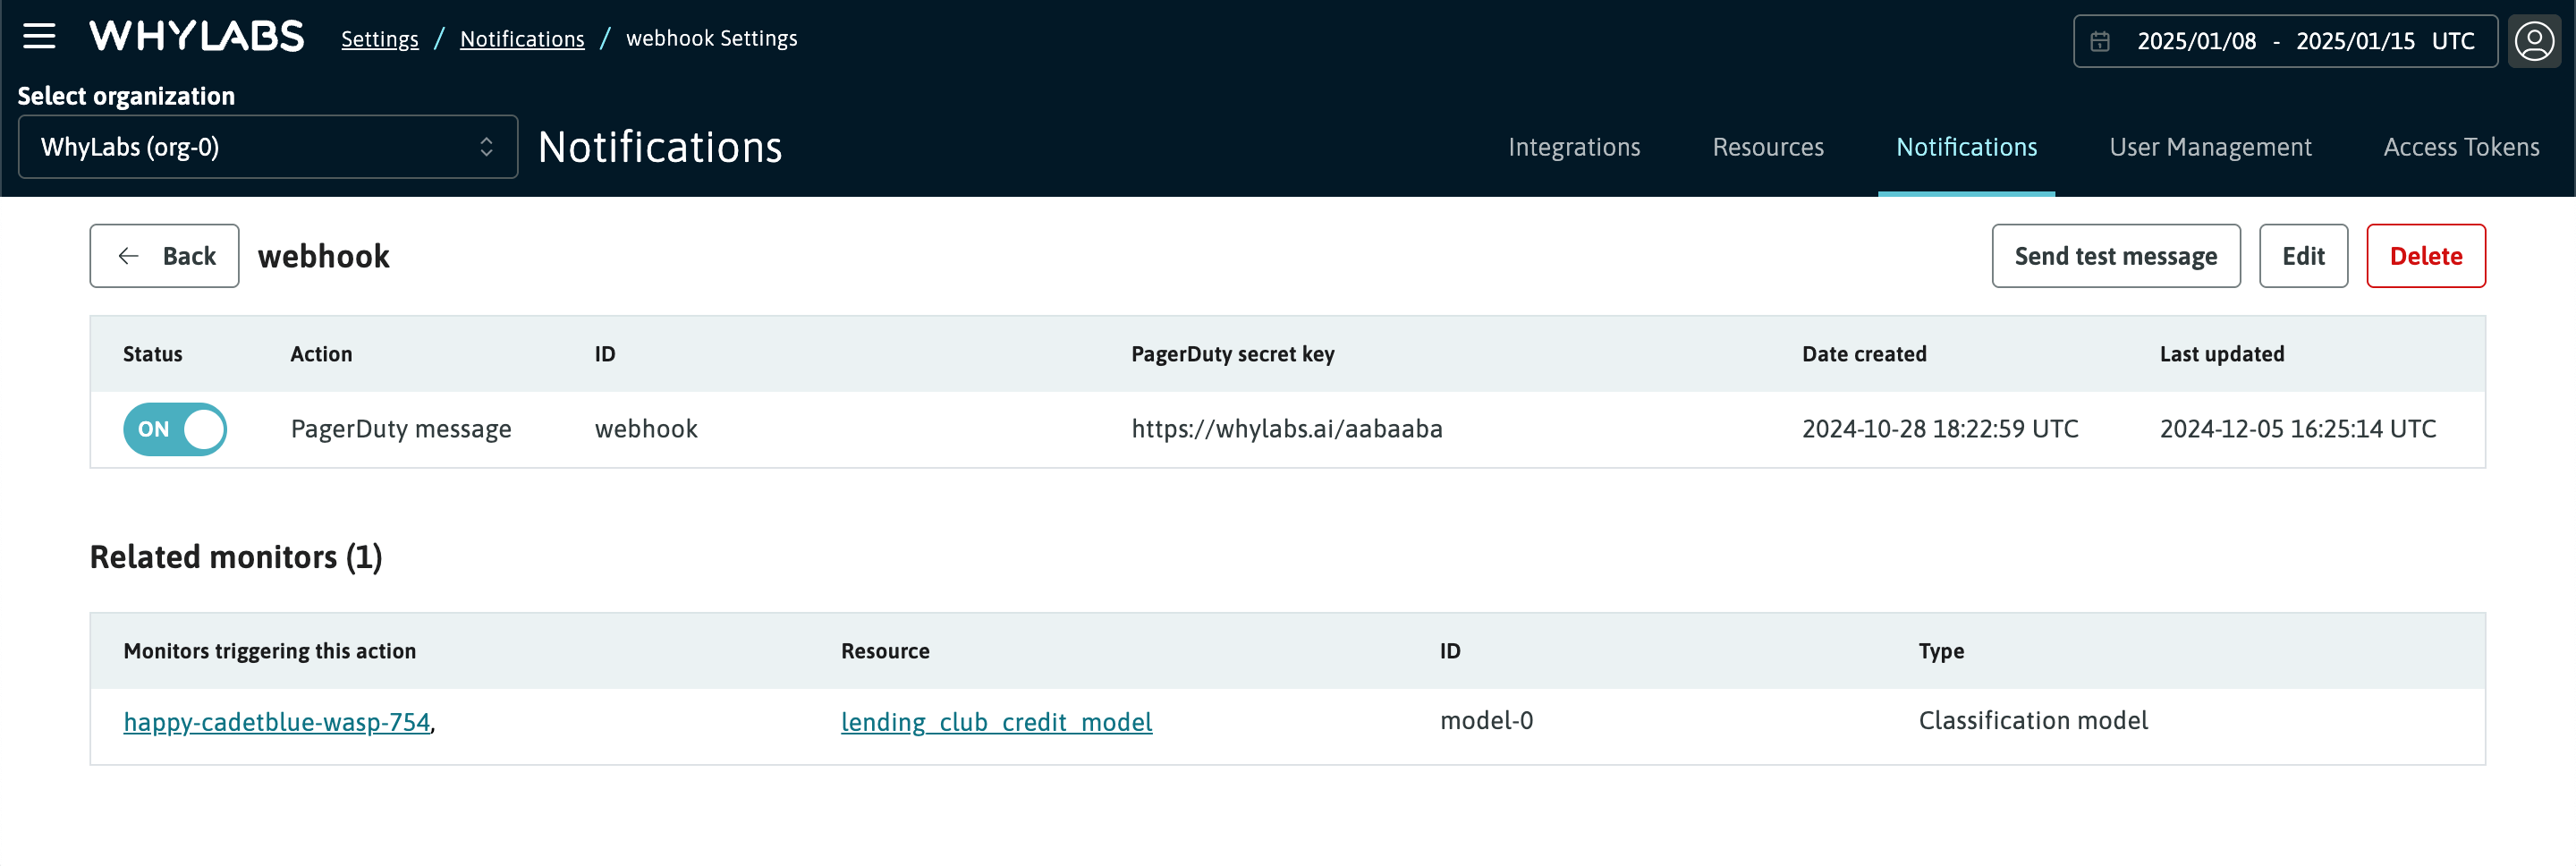
After clicking on a notification action, we can see the monitors that are triggering it, grouped at resource (model or dataset) level. This page also allows us to send a test notification to make sure the integration has been set up correctly.
Email Notifications
To set up email notifications, we recommend creating a mailing list dedicated to WhyLabs notifications, so that multiple team members can subscribe to it. Please work with your email administrator to configure permissions for the mailing list to receive external messages.
Email notifications are formatted based on the configured monitor type. When an alert is triggered, the notification will include information on the anomalous metric as well as the affected features and segments.
For Enterprise customers the notification content can be enriched with additional details to facilitate root cause analysis. Please contact us to enable this feature.
Slack Notifications
To set up Slack notifications, we recommend creating a dedicated Slack channel for WhyLabs notifications. Make sure all relevant team members are subscribed to the channel.
To obtain the Slack webhook, please follow this documentation: https://api.slack.com/messaging/webhooks.
Slack based notifications will look like the following:

PagerDuty Notifications
To set up PagerDuty notifications, please follow the steps below:
- In PagerDuty, create a Service to receive WhyLabs alerts.
- Once created, go to Integrations tab for this Service.
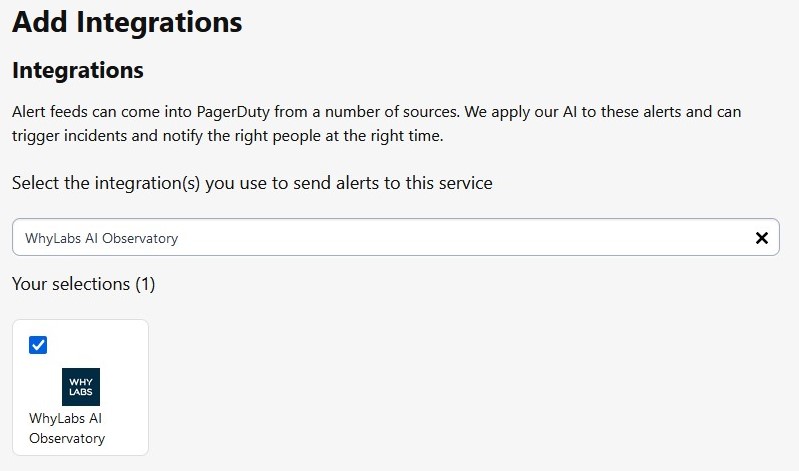
- Click Add New Integration. 4 Choose Events API V2.
- Search for "WhyLabs" and select the WhyLabs AI Observability integration.
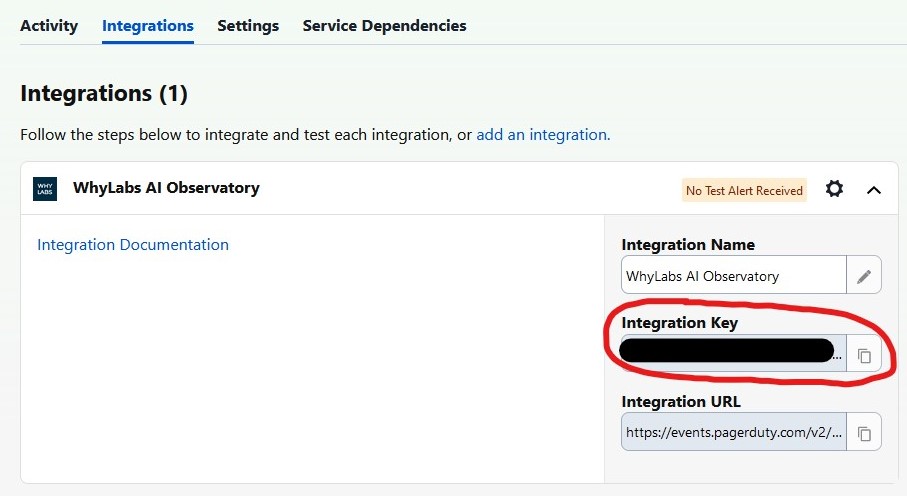
- Copy the integration key.
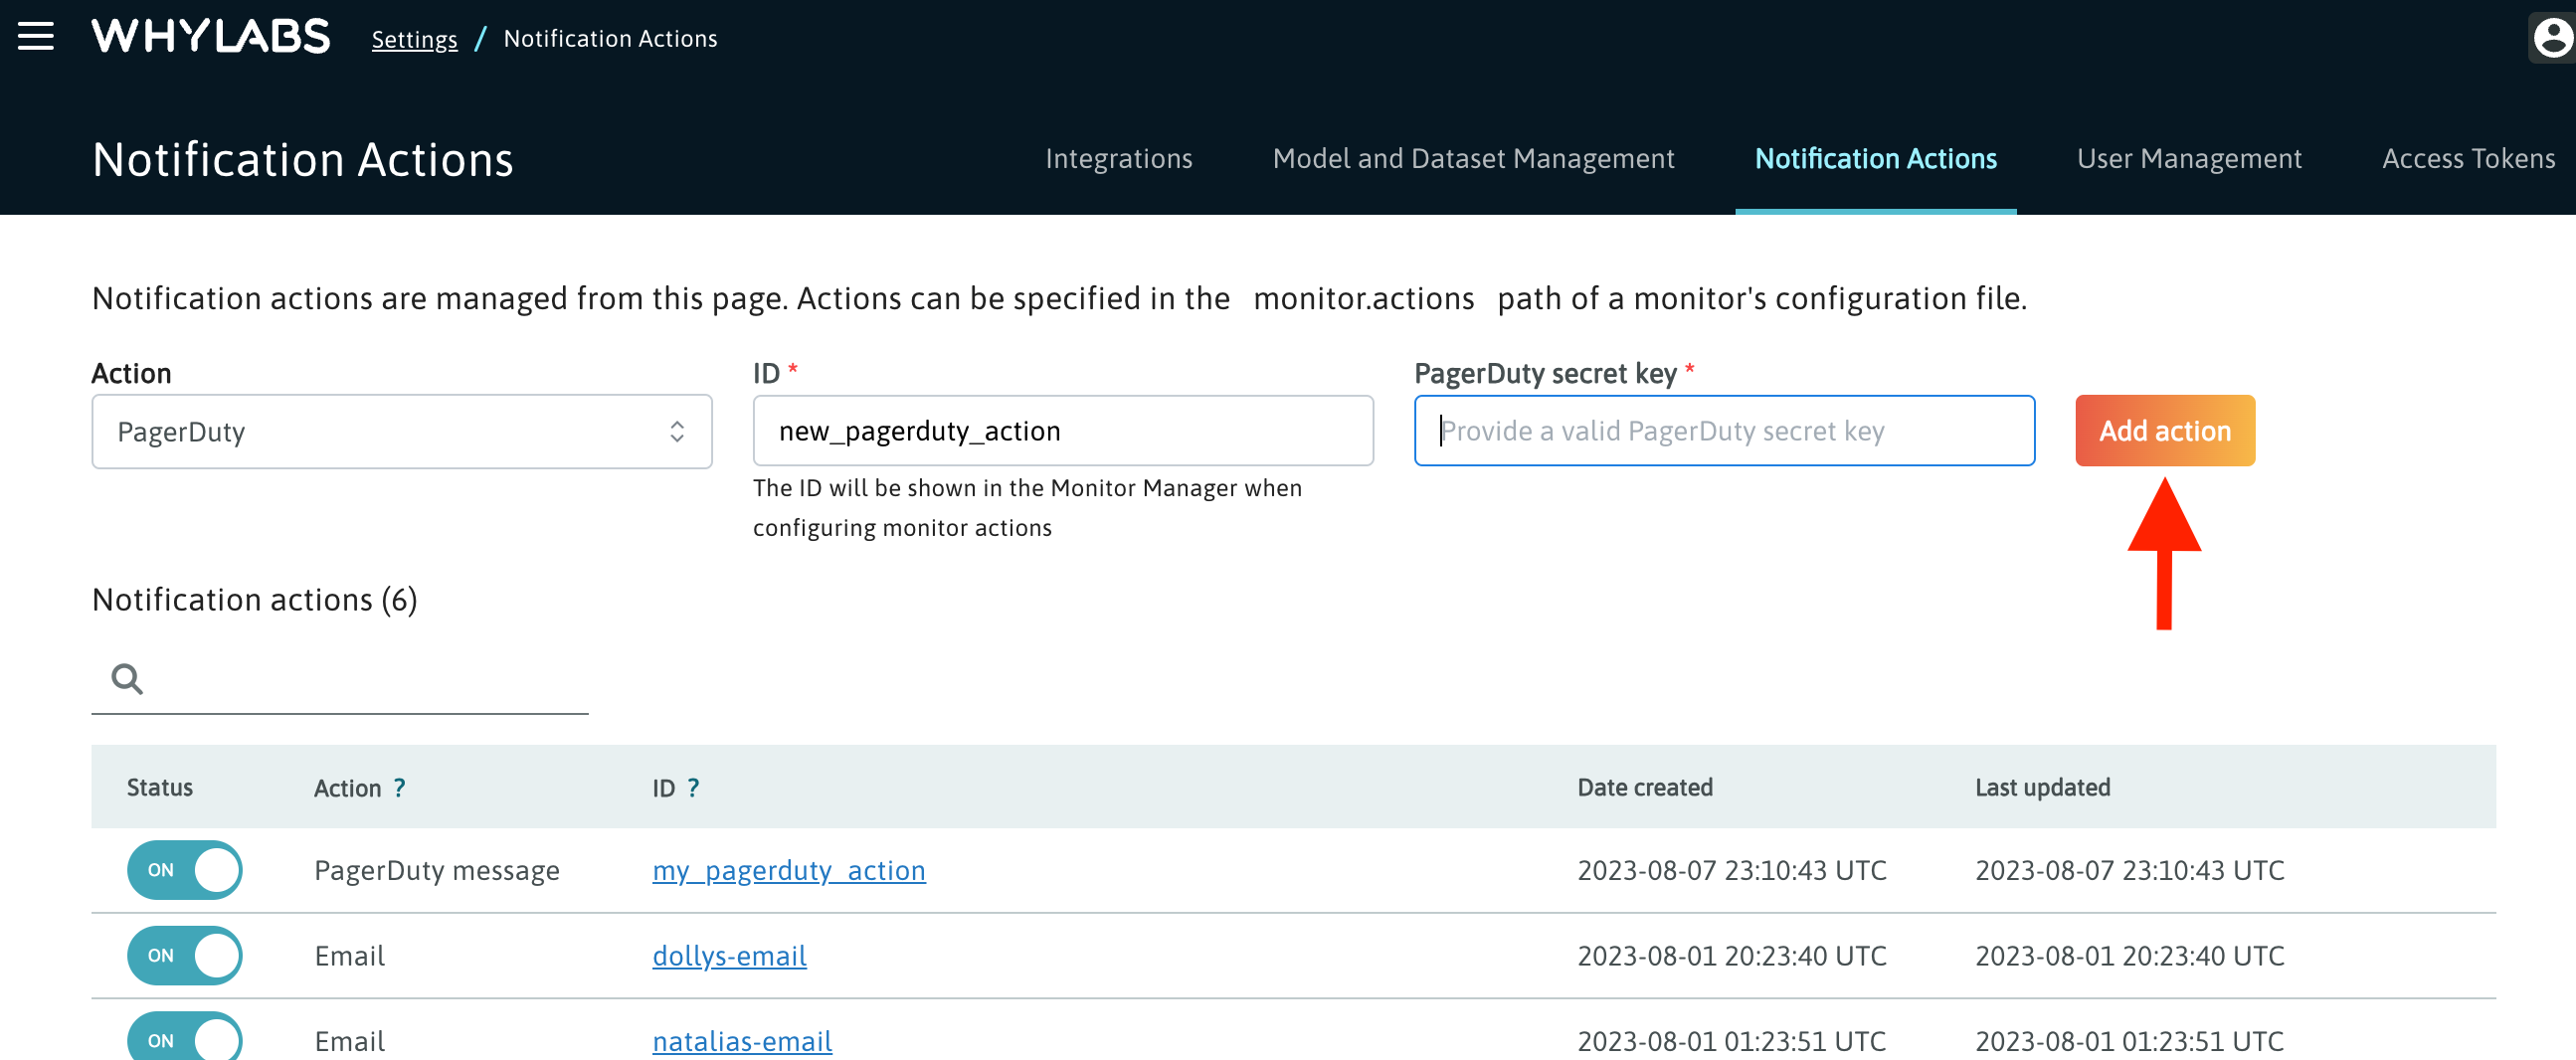
- Go to notification settings - note that only admin users have access to this page!
- Create a PagerDuty notification action. Paste the integration key from step 6.
You can test your newly created action by clicking on it and pressing the "Send test message" button.
After establishing a successful integration with the notification recipient, you can assign your action to the monitors. Read this section for more detailed instructions.
Adding actions to monitors
Once actions have been created, they are available for use in monitors. Assigning the notification targets to monitors can be done directly in the UI or programmatically.
Adding Actions to Monitors via UI
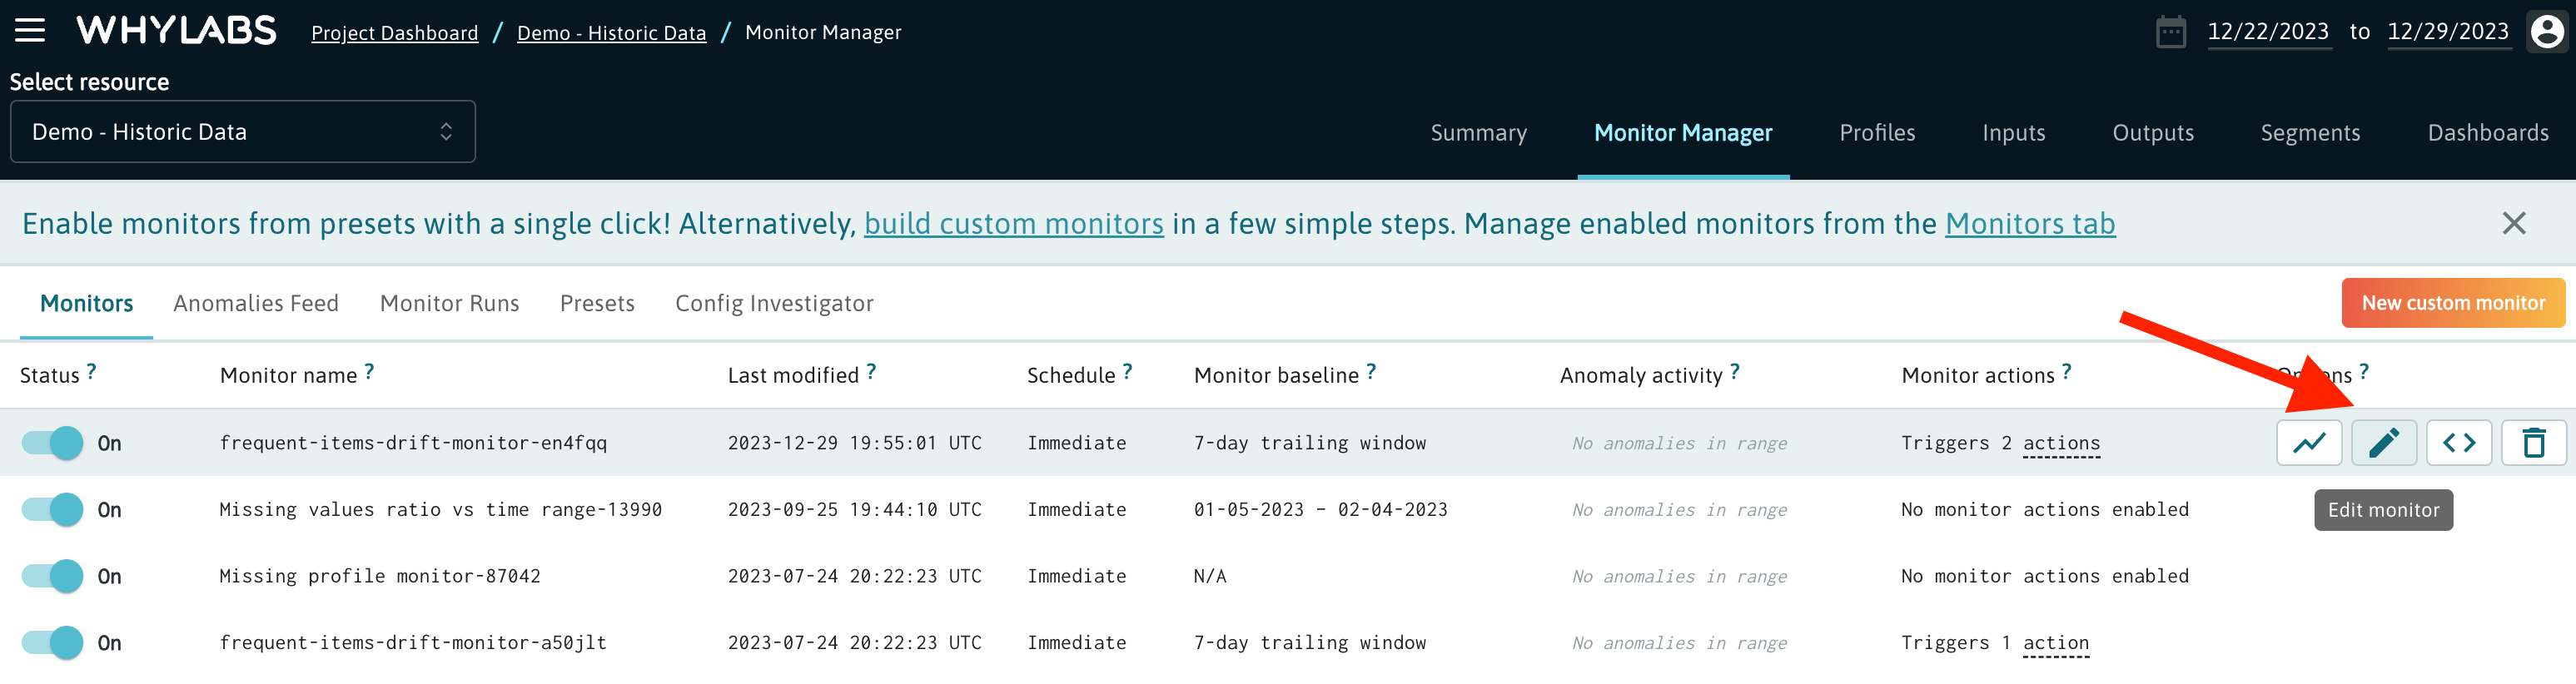
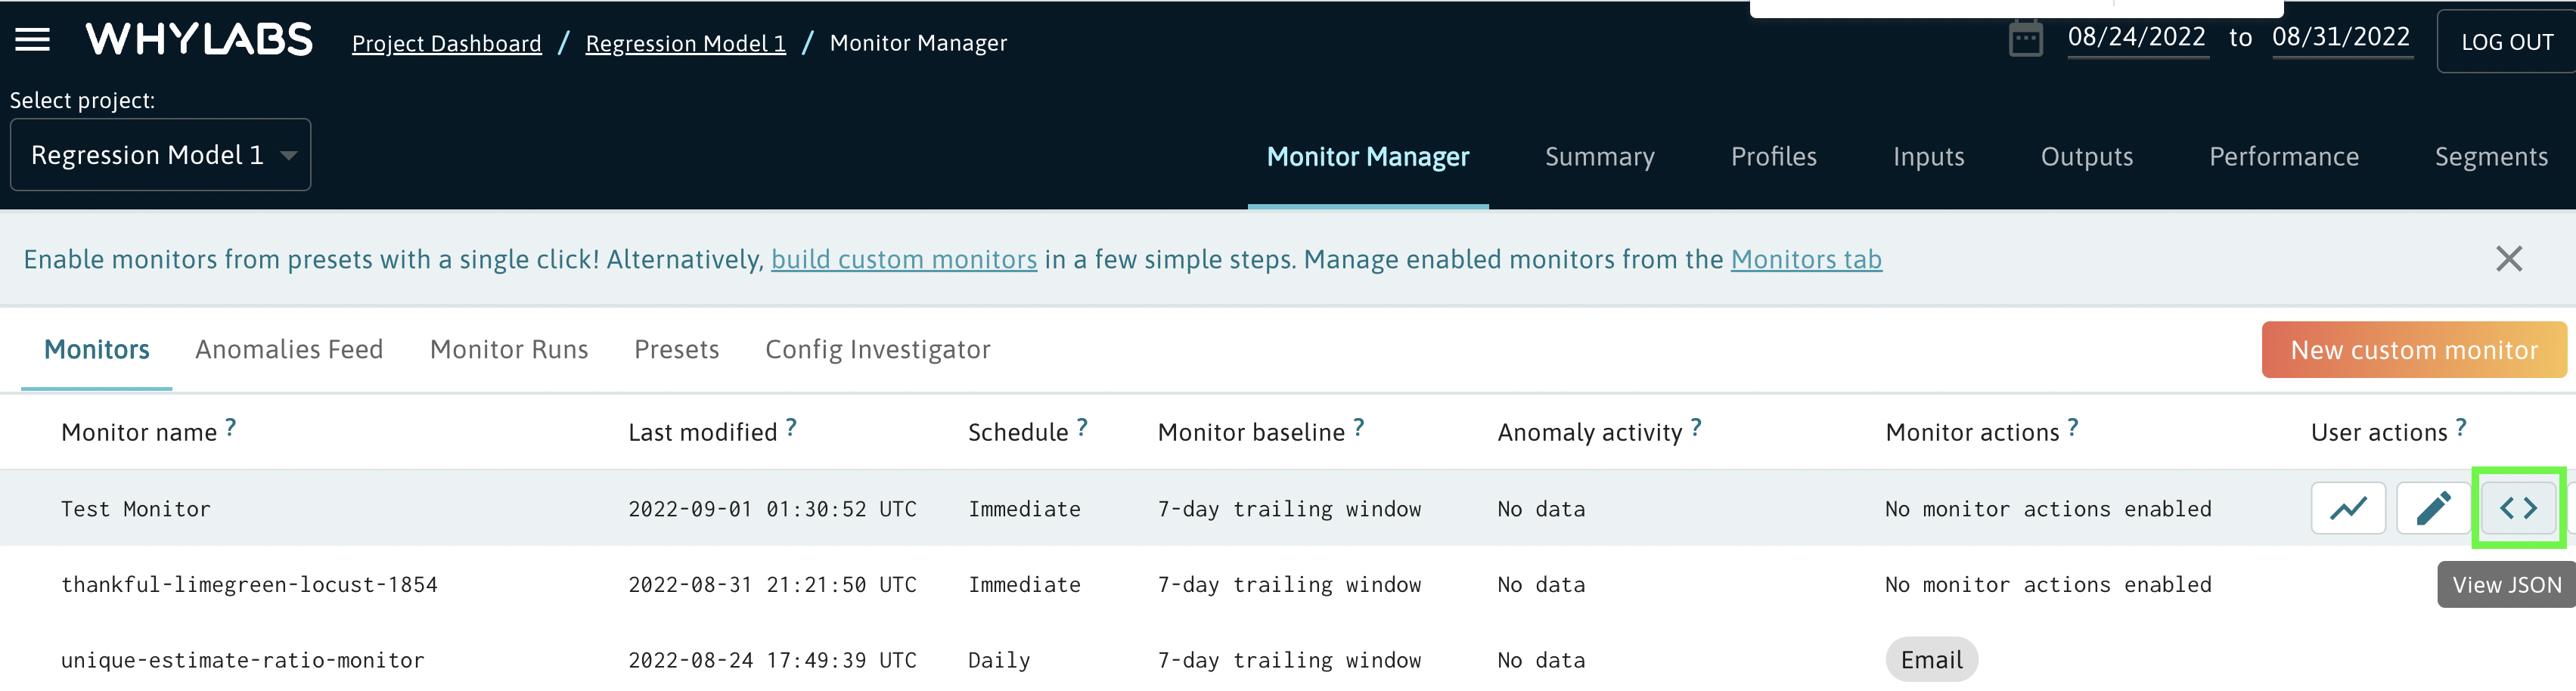
The most convenient way to enable notifications in a single monitor is to do that on the Monitor Manager page.
When you hover over the Options column, try clicking on the "Edit monitor" button if it's available - otherwise, skip to the section below ("Modifying the configuration via JSON editor").
Then, click on the pen icon by the last configuration step dedicated to notification actions. Add the desired actions via the drop-down menu and click "Save".
Modifying the configuration via JSON editor
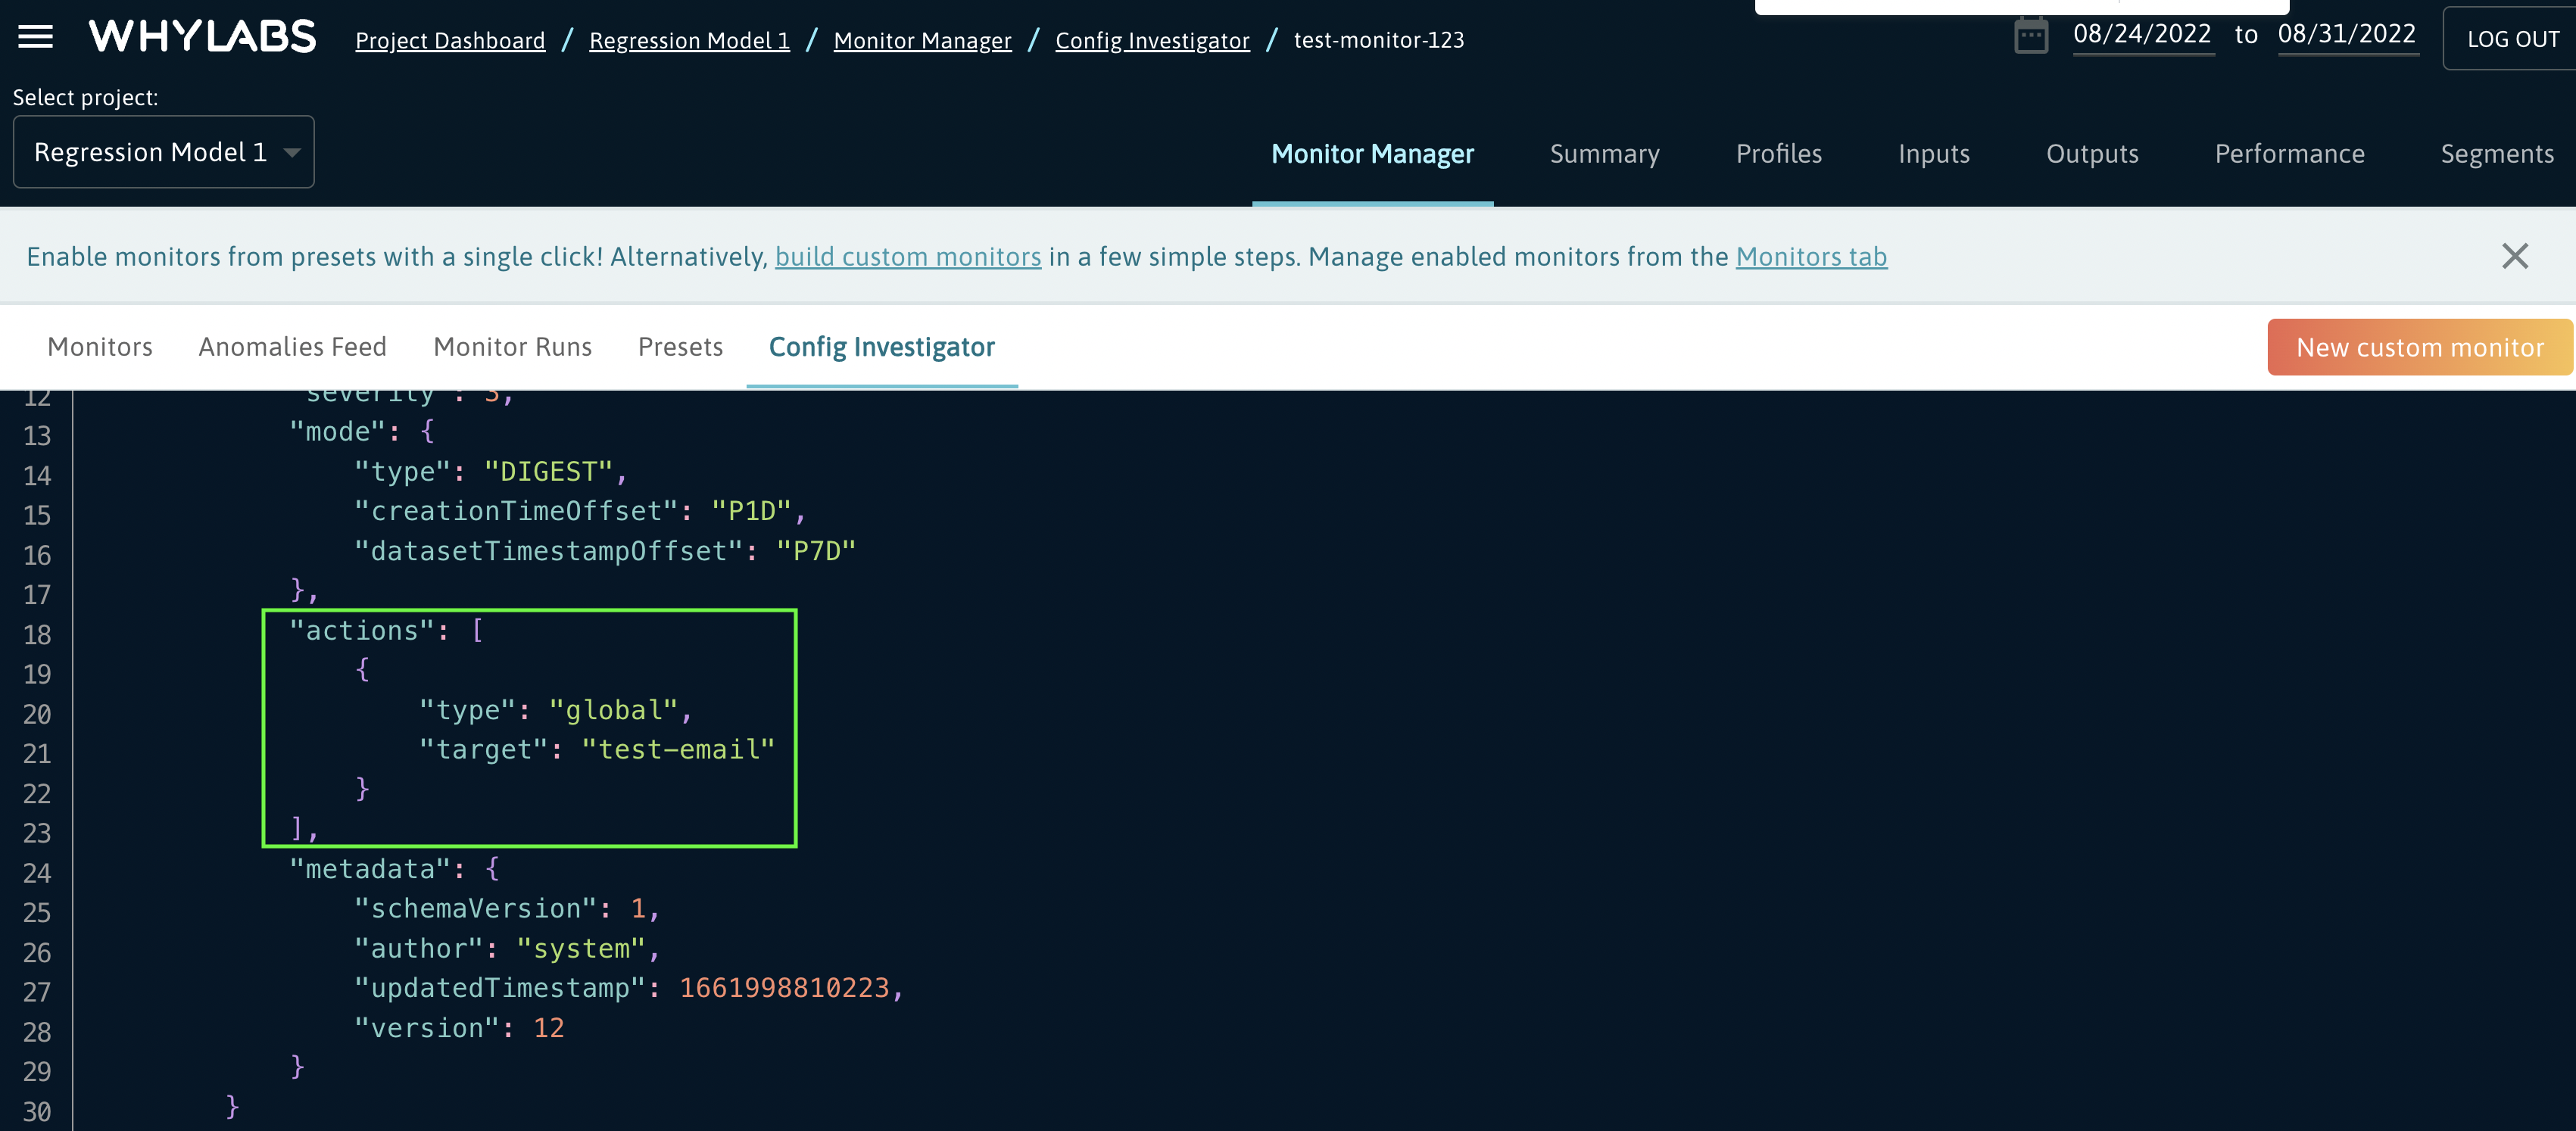
In case the "Edit monitor" button is greyed out, click on the “View JSON” button to enter the JSON editor.
From here, click the “Edit” button in the upper right corner of the JSON viewer.
Within the monitor config, you’ll find an “actions” list.
"monitors": [{
           ...
           "severity": 3,
           "mode": {
               "type": "DIGEST"
           },
           "actions": []
       }
   }
]
The list is empty if there are no notification actions attached to the given monitor. To enable the intended notifications, append to this list an element in the following format:
{"type": "global",
"target": "ACTION_ID"}
The type will always be global, and the target should be set to the ID of the action. There can be multiple actions referenced in this list, separated by a comma.
For example, a monitor configured as shown below will result in alerts delivered as a digest targetting an email address as well as a Slack channel:
"monitors": [{
            ...
            "severity": 3,
            "mode": {
                "type": "DIGEST"
            },
            "actions": [
                {
                "type": "global",
                "target": "my-email"
                },
                {
                "type": "global",
                "target": "my-slack-channel"
                }
            ]
        }
    }
]
After making updates, save the config changes and you’re good to go!
Note that this must be done for each of the monitors tied to a model in order for each of the model’s notifications to be delivered to the new target.
Adding Actions to Monitors Programmatically
In order to add an action to a monitor, you will need the relevant:
- API Key
- organization ID
- action ID
- WhyLabs resource ID (model or dataset ID)
- Monitor name or ID (only if specific monitors should be updated)
In this example, we will add a custom global action to each of the monitors belonging to a model. First, we pull all of the monitor config for a particular model:
# replace org-id and model-id
url = 'https://api.whylabsapp.com/v0/organizations/org-xxxx/models/model-xxxx/monitor-config/v3'

headers = {
    'accept': 'application/json',
    'X-API-Key': 'xxxxxxxxxxxxxxxxxxx'
    }

response = requests.get(url, headers=headers)
Now, we loop over each monitor associated with this model and add the new custom global action to the list of actions for each monitor. Once we’re done updating, we make a PUT request to update the monitor.
import json

new_action = {"type": "global", "target": "test-email"}

monitor_config = response.json()

for i in range(len(monitor_config['monitors'])):
        monitor_config['monitors'][i]['actions'].append(new_action)

# replace org-id and model-id
url = 'https://api.whylabsapp.com/v0/organizations/org-xxxx/models/model-xxxx/monitor-config/v3'

response = requests.put(url, headers=headers, json=monitor_config)
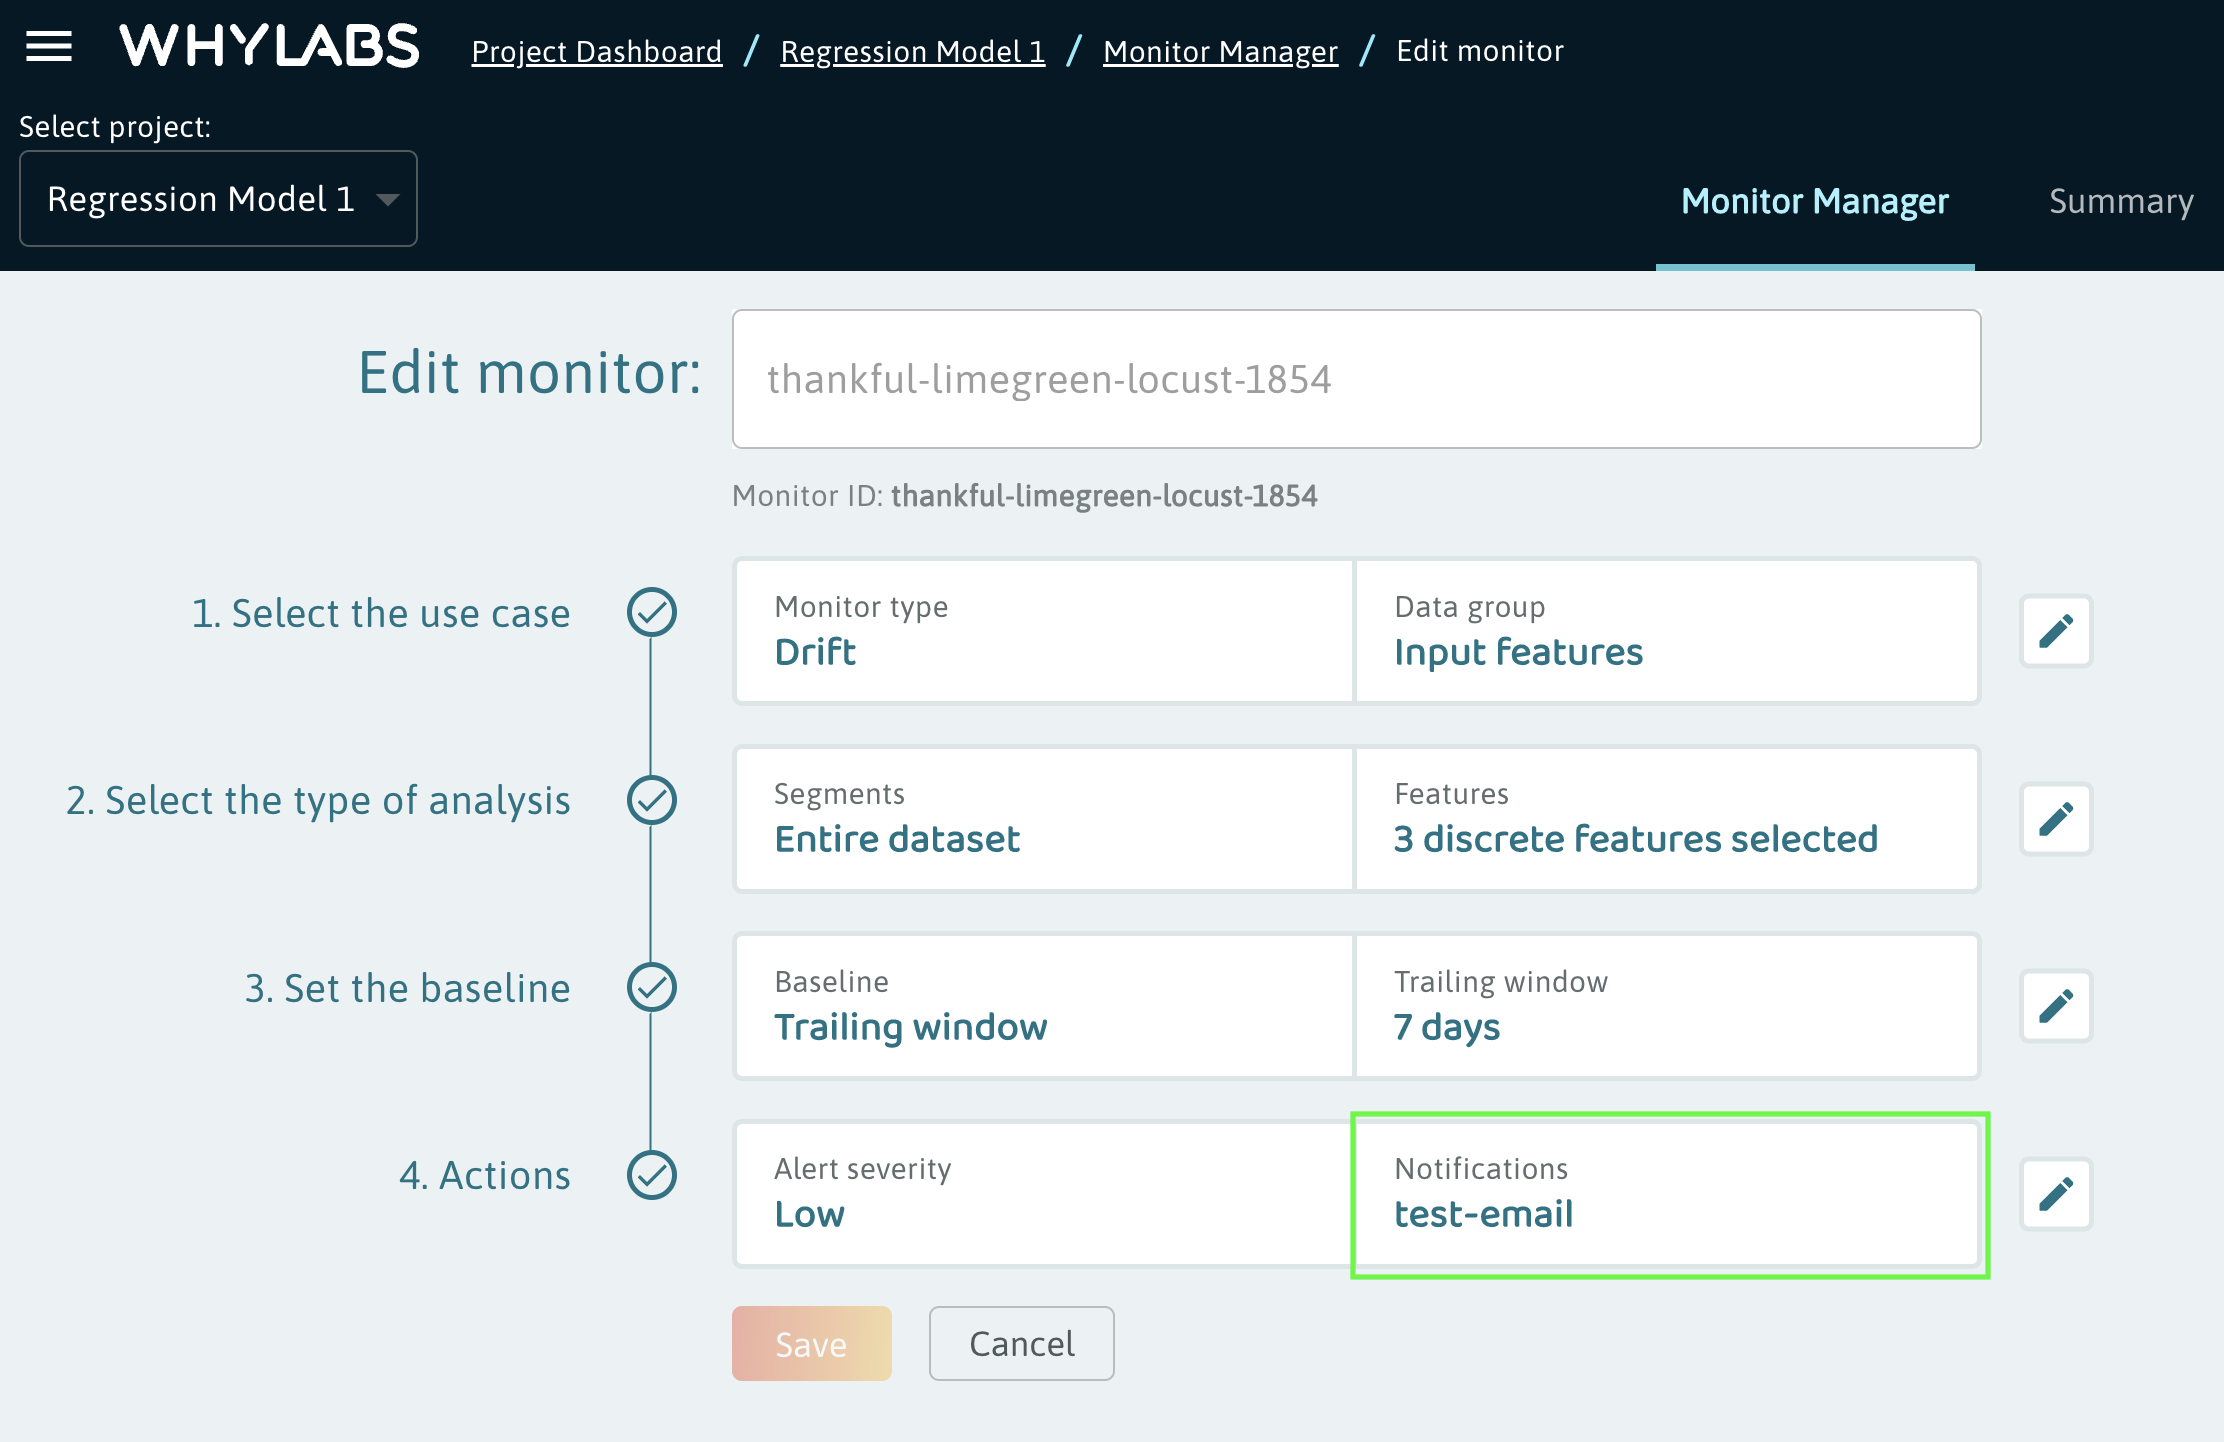
Upon completion, users can validate the update by re-pulling the monitor config or inspecting the JSON in the UI. Users should see the new custom global action ID listed when editing a monitor in the UI:
Please refer to our Swagger for more documentation of our APIs.
Notification content
Notifications will include a breakdown of alerts detected since the last notification was sent. For example, the PagerDuty notification may look like this:
{
  "contexts": [],
  "description": "Digest: Your monitor \"frequent_items_drift-monitor\" on dataset \"lending_club_credit_model\" detected 2 low severity issues",
  "event_type": "trigger",
  "incident_key": "DIGEST-model-0-frequent_items_drift-monitor-3cd59859-8607-469f-9f2a-62e3a3ad8c6b",
  "service_key": "xxxxxxxx",
  "details": {
    "datasetId": "model-0",
    "datasetName": "lending_club_credit_model",
    "id": "25466dad-8801-47bd-ba10-38e56056ea2a",
    "mode": "DIGEST",
    "most_recent_anomalies": [
      {
        "algorithm": "hellinger",
        "algorithm_mode": "frequent_items",
        "analysis_id": "35a95372-48c2-3ccf-bbd3-b4bfe0e89b4a",
        "analyzer_id": "frequent_items_drift-monitor-analyzer",
        "creation_timestamp": 1660350637716,
        "dataset_id": "model-0",
        "dataset_timestamp": 1660262400000,
        "feature": "addr_state",
        "granularity": "DAYS",
        "id": "4af75ba3-b13b-3107-9edf-308ec6194b3a",
        "metric": "frequent_items",
        "run_id": "3cd59859-8607-469f-9f2a-62e3a3ad8c6b",
        "segment": "purpose=car&verification_status=Not Verified",
        "target_level": "column",
        "type": "drift",
        "url": "https://hub.whylabsapp.com/models/model-0/segments/key=purpose&value=car&key=verification_status&value=Not Verified/features/addr_state?startDate=2022-07-29&endDate=2022-08-12&targetOrgId=org-0",
        "weight": 1
      },
      {
        "algorithm": "hellinger",
        "algorithm_mode": "frequent_items",
        "analysis_id": "768aaacb-60c3-3e92-9207-de4b672f0ce0",
        "analyzer_id": "frequent_items_drift-monitor-analyzer",
        "creation_timestamp": 1660350637475,
        "dataset_id": "model-0",
        "dataset_timestamp": 1660262400000,
        "feature": "earliest_cr_line",
        "granularity": "DAYS",
        "id": "81b7eb3b-8bd7-3edc-91a9-0391b74a3f82",
        "metric": "frequent_items",
        "run_id": "3cd59859-8607-469f-9f2a-62e3a3ad8c6b",
        "segment": "purpose=car&verification_status=Verified",
        "target_level": "column",
        "type": "drift",
        "url": "https://hub.whylabsapp.com/models/model-0/segments/key=purpose&value=car&key=verification_status&value=Verified/features/earliest_cr_line?startDate=2022-07-29&endDate=2022-08-12&targetOrgId=org-0",
        "weight": 1
      }
    ],
    "org_id": "org-0",
    "schema_version": "3.0",
    "severity": 3,
    "time_range": "2022-08-12T00:00:00.000Z/2022-08-12T00:00:00.000Z",
    "total_alerts": 2
  }
}
If the base notification template does not work for your use case, and your team would like to receive customized notifications instead, please reach out to us.

