Apache Spark
Overview
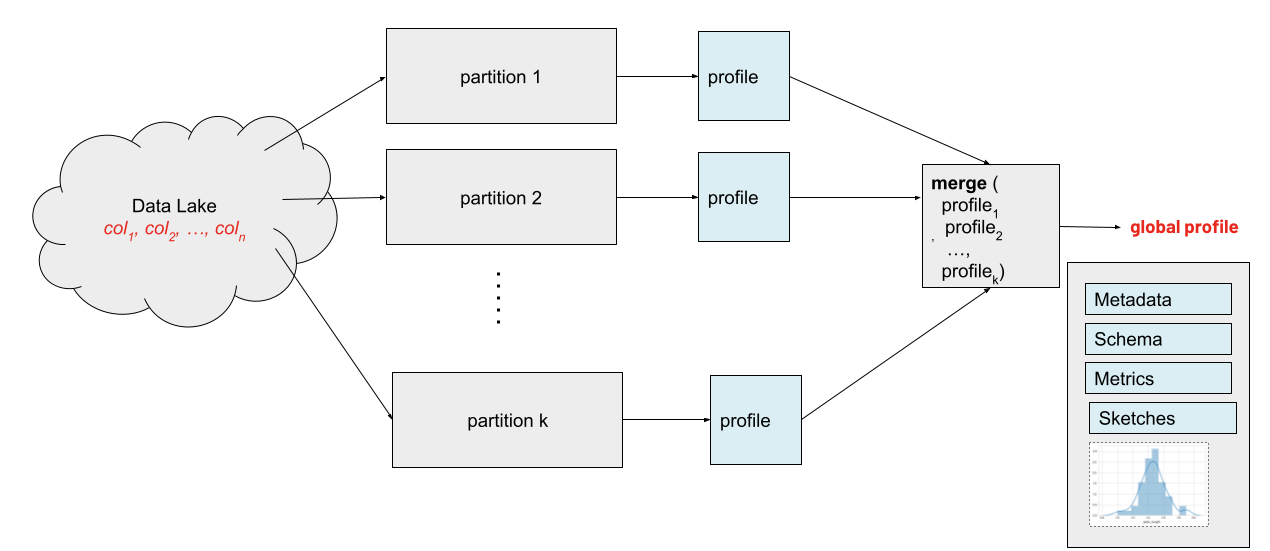
whylogs profiles are mergeable and therefore suitable for Spark's map-reduce style processing. Since whylogs requires only a single pass of data, the integration is highly efficient: no shuffling is required to build whylogs profiles with Spark.

Examples
PySpark Examples
Profiling
The following examples show how to use whylogs to profile a dataset using PySpark.
Please note that whylogs v1 users will need to first install the PySpark module. This is done as a separate installation to keep the core whylogs library as lightweight as possible and minimize dependencies.
pip install "whylogs[spark]"
- whylogs v0
- whylogs v1
from pyspark.sql.functions import *
from whyspark import new_profiling_session

# load the data
# public dataset available here: https://catalog.data.gov/dataset/fire-department-calls-for-service
raw_df = spark.read.option("header", "true").csv("/databricks-datasets/timeseries/Fires/Fire_Department_Calls_for_Service.csv")
df = raw_df.withColumn("call_date", to_timestamp(col("Call Date"), "MM/dd/YYYY"))

profiles = new_profiling_session(newProfilingSession("profilingSession"), name="fire_station_calls", time_colum="call_date") \
                 .groupBy("City", "Priority") \
                 .aggProfiles()
from pyspark.sql import SparkSession
from pyspark import SparkFiles
from whylogs.api.pyspark.experimental import collect_dataset_profile_view

spark = SparkSession.builder.appName('whylogs-testing').getOrCreate()
arrow_config_key = "spark.sql.execution.arrow.pyspark.enabled"
spark.conf.set(arrow_config_key, "true")

data_url = "http://archive.ics.uci.edu/ml/machine-learning-databases/wine-quality/winequality-red.csv"
spark.sparkContext.addFile(data_url)

spark_dataframe = spark.read.option("delimiter", ";") \
  .option("inferSchema", "true") \
  .csv(SparkFiles.get("winequality-red.csv"), header=True)

dataset_profile_view = collect_dataset_profile_view(input_df=spark_dataframe)
Profiling with Segments
If you want to create segments, you'll need to initialize a segmented schema object and pass it to the profiling function as shown in the code snippet below:
from whylogs.core.segmentation_partition import segment_on_column
from whylogs.core.resolvers import STANDARD_RESOLVER
from whylogs.core.schema import DeclarativeSchema
from whylogs.api.pyspark.experimental import (
    collect_segmented_results,
)
column_segments = segment_on_column("quality")
segmented_schema = DeclarativeSchema(STANDARD_RESOLVER, segments=column_segments)

segmented_results = collect_segmented_results(spark_dataframe,schema=segmented_schema)
Inspecting the Profiles
Standard profiles
In case of standard (unsegmented) profiles you can then generate a pandas DataFrame from the profiled dataset as shown below:
- whylogs v0
- whylogs v1
pdf = profiles.toPandas()

# use the following to extract and analyze individual profiles
from whylogs import DatasetProfile
prof = DatasetProfile.parse_delimited(pdf['why_profile'][0])[0]
dataset_profile_view.to_pandas()
Segmented profiles
Segmented profiles have a more complex structure with one profile per each segment. The amount of segments profiled can be checked as follows:
print(f"After profiling the result set has: {segmented_results.count} segments")
You can inspect each of the profiles within a segmented profile as shown below:
first_segment = segmented_results.segments()[0]
segmented_profile = segmented_results.profile(first_segment)

print("Profile view for segment {}".format(first_segment.key))
segmented_profile.view().to_pandas()
Uploading Profiles to WhyLabs
You can then upload the profile to the WhyLabs platform with the following code:
dataset_profile_view.writer("whylabs").write()
In case you wish to upload your data as a reference profile, use the code below instead:
dataset_profile_view.writer("whylabs").option(reference_profile_name="<reference profile alias>").write()
Related Resources
Scala Examples
This example shows how we use WhyLogs to profile a the lending club dataset.
// Tested on Databricks cluster running as scala notebook:
// * cluster version: 8.3 (includes Apache Spark 3.1.1, Scala 2.12)
// * installed whylogs jar: whylogs_spark_bundle_3_1_1_scala_2_12_0_1_21aeb7b2_20210903_224257_1_all-d1b20.jar
// * from: https://oss.sonatype.org/content/repositories/snapshots/ai/whylabs/whylogs-spark-bundle_3.1.1-scala_2.12/0.1-21aeb7b2-SNAPSHOT/whylogs-spark-bundle_3.1.1-scala_2.12-0.1-21aeb7b2-20210903.224257-1-all.jar

import java.time.LocalDateTime

import org.apache.spark.sql.functions._
import org.apache.spark.sql.{SaveMode, SparkSession}
import com.whylogs.spark.WhyLogs._

// COMMAND ----------

// For demo purposes we will create a time column with yesterday's date, so that WhyLabs ingestion sees this as a recent dataset profile
// and it shows up in default dashboard of last 7 days on WhyLabs.
def unixEpochTimeForNumberOfDaysAgo(numDaysAgo: Int): Long = {
    import java.time._
    val numDaysAgoDateTime: LocalDateTime = LocalDateTime.now().minusDays(numDaysAgo)
    val zdt: ZonedDateTime = numDaysAgoDateTime.atZone(ZoneId.of("America/Los_Angeles"))
    val numDaysAgoDateTimeInMillis = zdt.toInstant.toEpochMilli
    val unixEpochTime = numDaysAgoDateTimeInMillis / 1000L
    unixEpochTime
}

val timestamp_yesterday = unixEpochTimeForNumberOfDaysAgo(1)
println(timestamp_yesterday)
val timeColumn = "dataset_timestamp"


// COMMAND ----------

import org.apache.spark.sql.functions._
import org.apache.spark.sql.types.DataTypes
val spark = SparkSession
  .builder()
  .master("local[*, 3]")
  .appName("SparkTesting-" + LocalDateTime.now().toString)
  .config("spark.ui.enabled", "false")
  .getOrCreate()

// the file location below is using the lending_club_1000.csv uploaded onto a Databricks dbfs
//   e.g. from here https://github.com/whylabs/whylogs/blob/mainline/testdata/lending_club_1000.csv
// you will need to update that location based on a dataset you use or follow this example.
val input_dataset_location = "dbfs:/FileStore/tables/lending_club_1000.csv"

val raw_df = spark.read
  .option("header", "true")
  .option("inferSchema", "true")
  .csv(input_dataset_location)

// Here we add an artificial column for time. It is required that there is a TimestampType column for profiling with this API
val df = raw_df.withColumn(timeColumn, lit(timestamp_yesterday).cast(DataTypes.TimestampType))
df.printSchema()


// COMMAND ----------

val session = df.newProfilingSession("LendingClubScala") // start a new WhyLogs profiling job
  .withTimeColumn(timeColumn)
val profiles = session
  .aggProfiles() //  runs the aggregation. returns a dataframe of <dataset_timestamp, datasetProfile> entries

// COMMAND ----------

// optionally you might write the dataset profiles out somewhere before uploading to WhyLabs
profiles.write
    .mode(SaveMode.Overwrite)
    .parquet("dbfs:/FileStore/tables/whylogs_demo_profiles_parquet")

// COMMAND ----------

// Replace the following parameters below with your values after signing up for an account at https://whylabs.ai/
// You can find Organization Id on https://hub.whylabsapp.com/settings/access-tokens and the value looks something like: org-123abc
// also the settings page allows you t create new apiKeys which you will need an apiKey to upload to your account in WhyLabs
// The modelId below specifies which model this profile is for, by default an initial model-1 is created but you will update this
// if you create a new model here https://hub.whylabsapp.com/settings/model-management
session.log(
          orgId = "replace_with_your_orgId",
          modelId = "model-1",
          apiKey = "replace_with_your_api_key")
This example can also be found in our whylogs library here

